Proxmox automatic snapshots with cv4pve-autosnap
With cv4pve-autosnap, snapshots of VMs and CTs in Proxmox can be automated. Since restoring my VMs from backups can take several hours depending on their size, I wanted a solution for a potentially faster restore in case I broke something while playing around.
The application can be run remotely or locally on the Proxmox host. A user or, since PVE 6.2, an API token can be used to run the snapshots.
⚠️ If you are already running snapshots on the file system level (i.e. zfs snapshots) – these snapshots could interfere with these since it uses the build in Proxmox features.
Installation#
To install, download the compiled version, unzip it, adjust the permissions, and move it:
wget https://github.com/Corsinvest/cv4pve-autosnap/releases/latest/download/cv4pve-autosnap-linux-x64.zip
unzip cv4pve-autosnap-linux-x64.zip
chmod +x cv4pve-autosnap
mv cv4pve-autosnap /usr/local/bin/
Rights#
To execute this, the Proxmox user or API token requires the following rights
- VM.Audit
- VM.Snapshot
- Datastore.Audit
- Pool.Audit
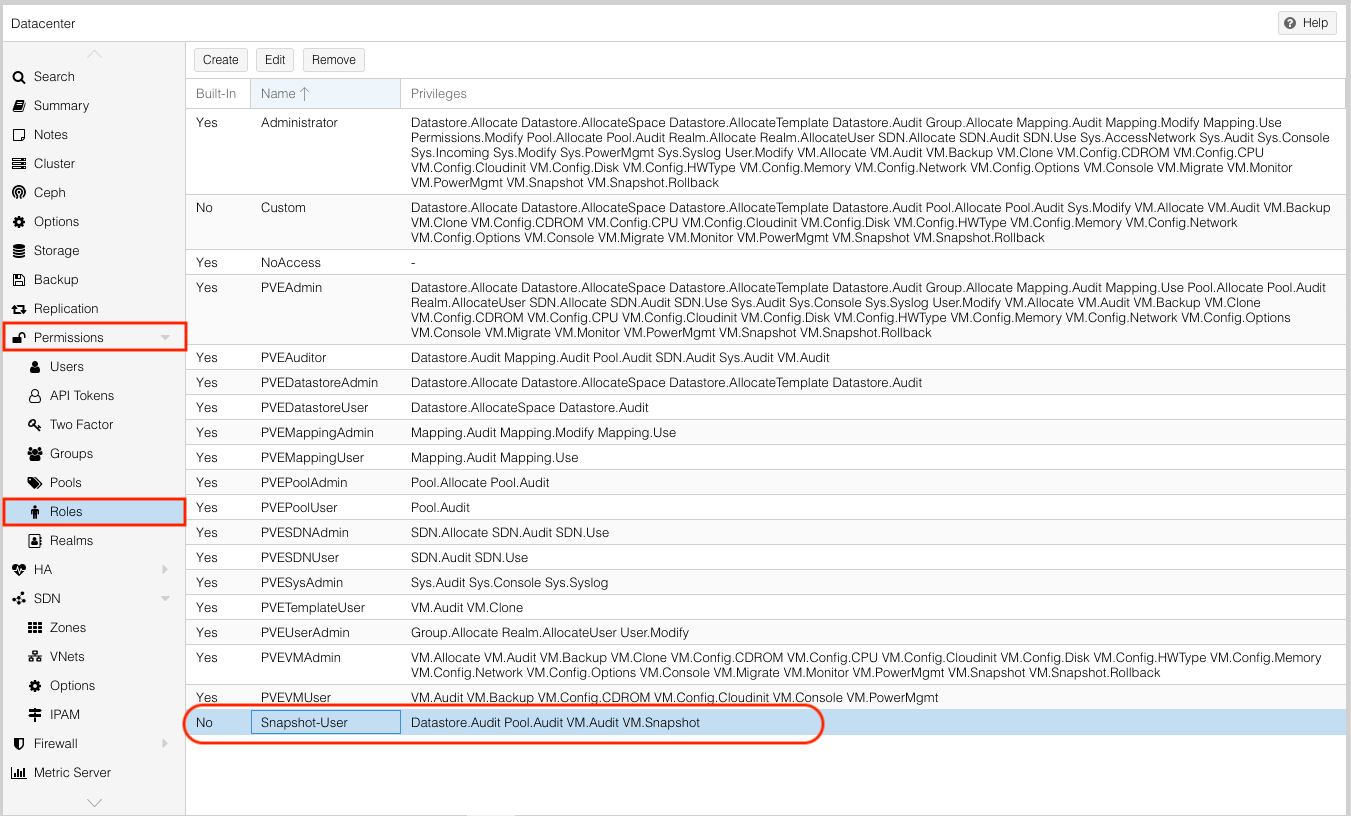
There needs to be a new role in order to assign the rights. The role can be created under “Datacenter > Permissions > Roles”.
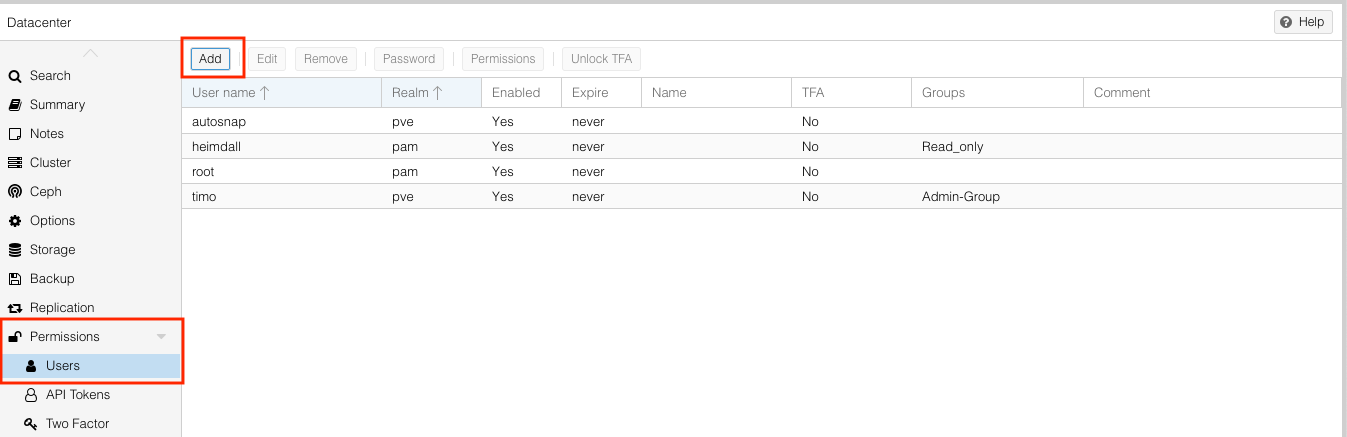
After that a user or api token needs to be created.
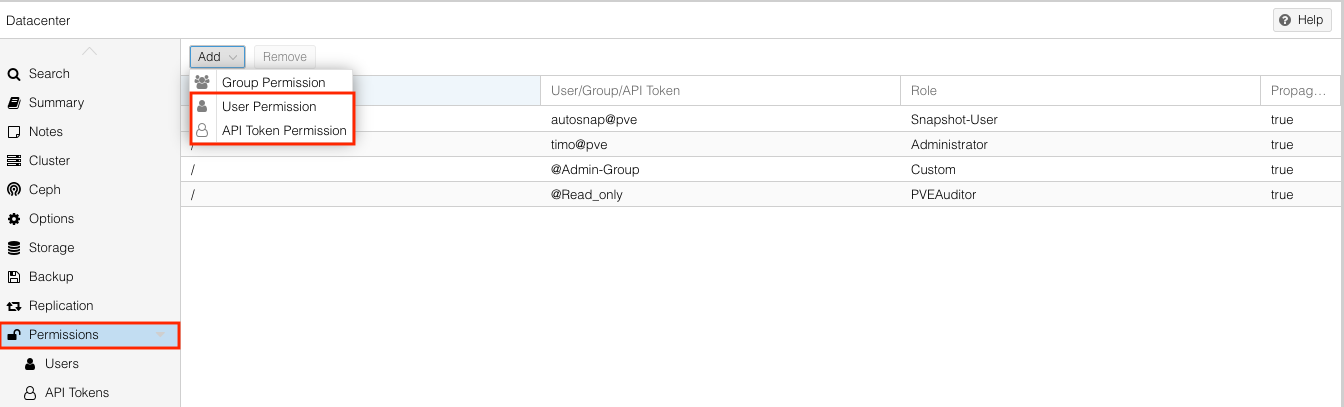
When both are created we need to connect them under the “Permissions” menu. If rights are missing, this will also be highlighted by the program during execution.
Execution#
The program can be executed like any other program over the command line.
cv4pve-autosnap --host=127.0.0.1 --username="autosnap@pve" --password="PASSWORD" --vmid=all snap --label="daily" --keep=6
Labels#
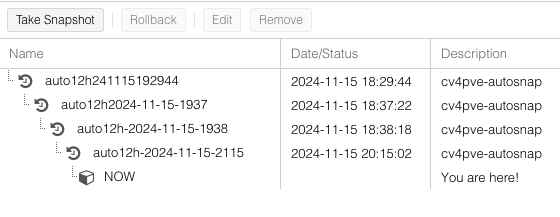
The program recognizes the snapshots via the labels and can count how many snapshots exist, which ones need to be deleted, and which ones can be kept. Labels can be chosen freely. However, concise names such as “daily,” “weekly,” or “hourly” are recommended, as the label also appears in the name of the snapshot.
Different numbers of snapshots can also be retained across different labels.
cv4pve-autosnap --host=127.0.0.1 --username="autosnap@pve" --password="PASSWORD" --vmid=all snap --label="daily" --keep=6
cv4pve-autosnap --host=127.0.0.1 --username="autosnap@pve" --password="PASSWORD" --vmid=all snap --label="weekly" --keep=4
cv4pve-autosnap --host=127.0.0.1 --username="autosnap@pve" --password="PASSWORD" --vmid=all snap --label="monthly" --keep=2
Timestamps#
The timestamp that appears in the name can be customized using the –timestamp-format parameter. The default setting is yyMMddHHmmss, which I personally find a little confusing. That’s why I prefer to use yyyy-MM-dd-HHmm.
cv4pve-autosnap --host=127.0.0.1 --username="snapshot@pve" --password="PASSWORD" --vmid=all --timestamp-format -yyyy-MM-dd-HHmm snap --label="monthly" --keep=2
Cron#
To run the snapshots regularly and at a specific time, the command or multiple commands can simply be added to cron.
To create the schedule, I recommend https://crontab.guru. Once the time has been defined, simply copy the command behind it.
15 15 * * * /usr/local/bin/cv4pve-autosnap --host=127.0.0.1 --usenname="autosnap@pve" --password="PASSWORD" --vmid=all --timestamp-format -yyyy-MM-dd-HHmm snap --label="12h" --keep=6
15 21 * * * /usr/local/bin/cv4pve-autosnap --host=127.0.0.1 --username="autosnap@pve" --password="PASSWORD" --vmid=all --timestamp-format -yyyy-MM-dd-HHmm snap --label="12h" --keep=6
Show status of all snapshots#
cv4pve-autosnap --host=127.0.0.1 --username="autosnap@pve" --password="PASSWORD" --vmid=all status
Delete all snapshots#
To delete all or specific snapshots, use the clean command and simply set the --keep parameter to 0. In addition, --vmid can be used to determine whether all VMs are affected or only specific IDs.
cv4pve-autosnap --host=127.0.0.1 --username="autosnap@pve" --password="PASSWORD" --vmid=all clean --label="daily" --keep=0