Hardening your Tailscale VPN for your homelab
Tailscale makes it easy to connect devices securely, but its default settings are designed for convenience rather than strict security. Without a few adjustments, every device in your Tailnet can talk to every other one which in my case I don’t wanted. So I looked into how to raise my security in using Tailscale for accessing my homelab and now share my findings and results.
General Security Advice#
Because Tailscale relies on an external identity provider—such as Apple, Microsoft, or Google—it’s essential to secure that account properly.
Enable two-factor authentication (2FA) on your identity provider account. This ensures that whenever you log in to Tailscale or add a new device, you are required to complete an additional authentication step, significantly reducing the risk of unauthorized access.
Tailnet Lock and Device Approval#
To further secure your Tailnet, consider enabling Tailnet Lock or Device Approval. Both act as an additional layer of protection when adding new devices.
Tailnet Lock#
Tailnet Lock requires that any new device added to your Tailnet be cryptographically approved by one of your designated signing devices. These signing devices are selected from your existing devices when you enable Tailnet Lock. I opted for this.
A key advantage of Tailnet Lock is that it does not rely on Tailscale’s infrastructure for approvals. This provides an extra level of security in the unlikely event that Tailscale’s infrastructure itself is compromised.
Device Approval#
Device Approval works in a similar way but does rely on Tailscale’s infrastructure. When a new device is added, approval is granted through the Tailscale web interface. While slightly less independent than Tailnet Lock, it still provides strong protection against unauthorized devices joining your Tailnet. So you should enable at least one of the two.
Access Control List (ACL)#
By default, all nodes you add to your Tailnet (your private network in Tailscale) can communicate with each other. This behavior is the result of the default Access Control List (ACL) configuration. ACLs in Tailscale work like a firewall: rules are evaluated from top to bottom, with an implicit “deny all” rule at the end. To follow the principle of least privilege, you should explicitly define rules that allow only the traffic you actually need, rather than relying on the permissive default.
Designing your ACLs ultimately comes down to how you want to use and restrict connections between your devices. In my case, I access my homelab through a subnet router running as a virtual machine. Traffic from that subnet router also passes through an additional firewall inside my homelab. In addition, I have a second subnet router running at my parents’ house and a private VPS, both connected to my Tailnet. All of these systems are considered servers, and I assign them the server tag.
My laptop, mobile phone, and iPad act as clients. These devices need access to the servers, but the servers themselves do not need to communicate with each other. Based on this model, my ACLs are structured to allow client-to-server access only. It looks like this:
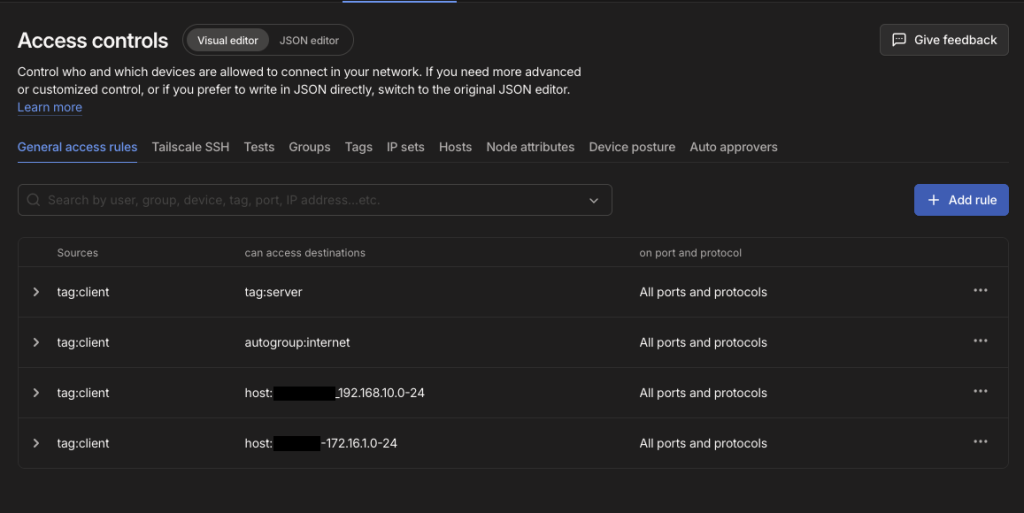
When using subnet routers, you must also explicitly allow access to the networks that are reachable over Tailscale. The autogroup:internet destination is required when using exit nodes. Since my servers do not need internet access through Tailscale, only the client devices are permitted to use exit nodes.